分析@Autowired @Resource注解的自动依赖注入的实现
一、先说结论
本节将深入分析源码,所以会显得又臭又长,请做好准备BeanFactory和ApplicationContext对于bean值的注入都采用反射的方式完成
BeanFactory也有基于XML的依赖注入功能,不管你需不需要,都会将所有setter属性注入。如果同时开启基于注解和基于XML的依赖注入,会存在重复注入的问题
ApplicationContext对于@Resource的依赖注入采用CommonAnnotationBeanPostProcessor完成,BeanFactory有该name的bean则采用”byName”形式,否则采用”byType”形式
ApplicationContext对于@Autowired的依赖注入采用AutowiredAnnotationBeanPostProcessor完成,优先采用”byType”形式
二、构造器注入
构造注入也就是通过构造方法注入依赖,构造函数的参数一般情况下就是依赖项,spring容器会根据bean中指定的构造函数参数来决定调用那个构造函数,看下面配置:1
2
3
4
5
6
7
8
9<?xml version="1.0" encoding="UTF-8"?>
<beans xmlns="http://www.springframework.org/schema/beans"
xmlns:xsi="http://www.w3.org/2001/XMLSchema-instance"
xsi:schemaLocation="http://www.springframework.org/schema/beans http://www.springframework.org/schema/beans/spring-beans.xsd">
<bean id="student" class="com.example.methodlog.Student">
<constructor-arg name="name" value="小明"/>
</bean>
</beans>
1 | public static void main(String[] args) { |
如果仔细看过上文“Bean的实例化”一节,就知道在bean实例化时“会寻找一个构造函数来实例化”。此时会寻找合适的构造函数,并转换构造函数所需的参数,然后反射调用构造函数进行实例化。1
2
3
4
5
6
7
8
9
10public BeanWrapper autowireConstructor(final String beanName, final RootBeanDefinition mbd,
@Nullable Constructor<?>[] chosenCtors, @Nullable final Object[] explicitArgs) {
......
ConstructorArgumentValues cargs = mbd.getConstructorArgumentValues();
resolvedValues = new ConstructorArgumentValues();
minNrOfArgs = resolveConstructorArguments(beanName, mbd, bw, cargs, resolvedValues);
......
beanInstance = strategy.instantiate(mbd, beanName, this.beanFactory, constructorToUse, argsToUse);
......
}
三、setter注入
setter注入顾名思义,被注入的属性需要有set方法,setter注入支持简单类型和引用类型,setter注入在bean实例创建完成后执行。看setter注入的xml文件配置:1
2
3
4
5
6
7
8
9<?xml version="1.0" encoding="UTF-8"?>
<beans xmlns="http://www.springframework.org/schema/beans"
xmlns:xsi="http://www.w3.org/2001/XMLSchema-instance"
xsi:schemaLocation="http://www.springframework.org/schema/beans http://www.springframework.org/schema/beans/spring-beans.xsd">
<bean id="student" class="com.example.methodlog.Student">
<property name="name" value="小明"/>
</bean>
</beans>
看过之前BeanFactory的创建过程,可以立即想到属性值的注入是populateBean方法完成的。再来回顾一下该方法:
根据BeanPostProcessor的返回值决定是否填充属性
提取
标签中配置的需要填充的属性 提取“基于XML的自动依赖注入”所需要注入的属性
属性填充前的再处理,可以在这里对需要填充的属性进行处理、添加、减少。@Autowired/@Resource的属性值填充就是在这里完成的
真正的属性填充步骤
1 | protected void populateBean(String beanName, RootBeanDefinition mbd, @Nullable BeanWrapper bw) { |
从以上代码可以看出,BeanFactory会提取用户配置的setter属性,附加上“基于XML的自动依赖注入”所需要注入的属性,然后将这些属性经过BeanPostProcessor的处理,到这里就算完成了对全部属性的提取,最终再调用applyPropertyValues方法将值塞到bean中。所以需要再追踪到applyPropertyValues方法中看它干了什么。
1 | protected void applyPropertyValues(String beanName, BeanDefinition mbd, BeanWrapper bw, PropertyValues pvs) { |
如果继续跟踪bw.setPropertyValues这行方法的代码,可以跟的很深,但最终我们也能拨开云雾看到本质:反射调用setter方法设值1
2
3
4
5
6
7
8public void setValue(final @Nullable Object value) throws Exception {
final Method writeMethod = (this.pd instanceof GenericTypeAwarePropertyDescriptor ?
((GenericTypeAwarePropertyDescriptor) this.pd).getWriteMethodForActualAccess() :
this.pd.getWriteMethod());
......
ReflectionUtils.makeAccessible(writeMethod);
writeMethod.invoke(getWrappedInstance(), value);
}
四、基于XML的依赖注入
只用过基于@Resource/@Autowired注解的依赖注入?别急,先看看基于XML的依赖注入。基于注解的依赖注入是Spring2.5提供的功能,而在此之前,使用XML文件配置也可以实现依赖注入,可以这样配置:1
2
3
4
5
6
7
8
9
10
11
12<?xml version="1.0" encoding="UTF-8"?>
<beans xmlns="http://www.springframework.org/schema/beans"
xmlns:xsi="http://www.w3.org/2001/XMLSchema-instance"
xsi:schemaLocation="http://www.springframework.org/schema/beans http://www.springframework.org/schema/beans/spring-beans.xsd">
<bean id="student" class="com.example.methodlog.Student">
<property name="name" value="小明"/>
</bean>
<bean id="teacher" class="com.example.methodlog.Teacher" autowire="byName">
<!--<property name="student" ref="student"/>-->
</bean>
</beans>
1 | public class Teacher { |
1 | public static void main(String[] args) { |
通过在autowire="byName"便可以启动BeanFactory的自动依赖注入,从BeanFactory中获取到的Teacher实体的student属性不会为null。
但看xml文件配置,是注释掉了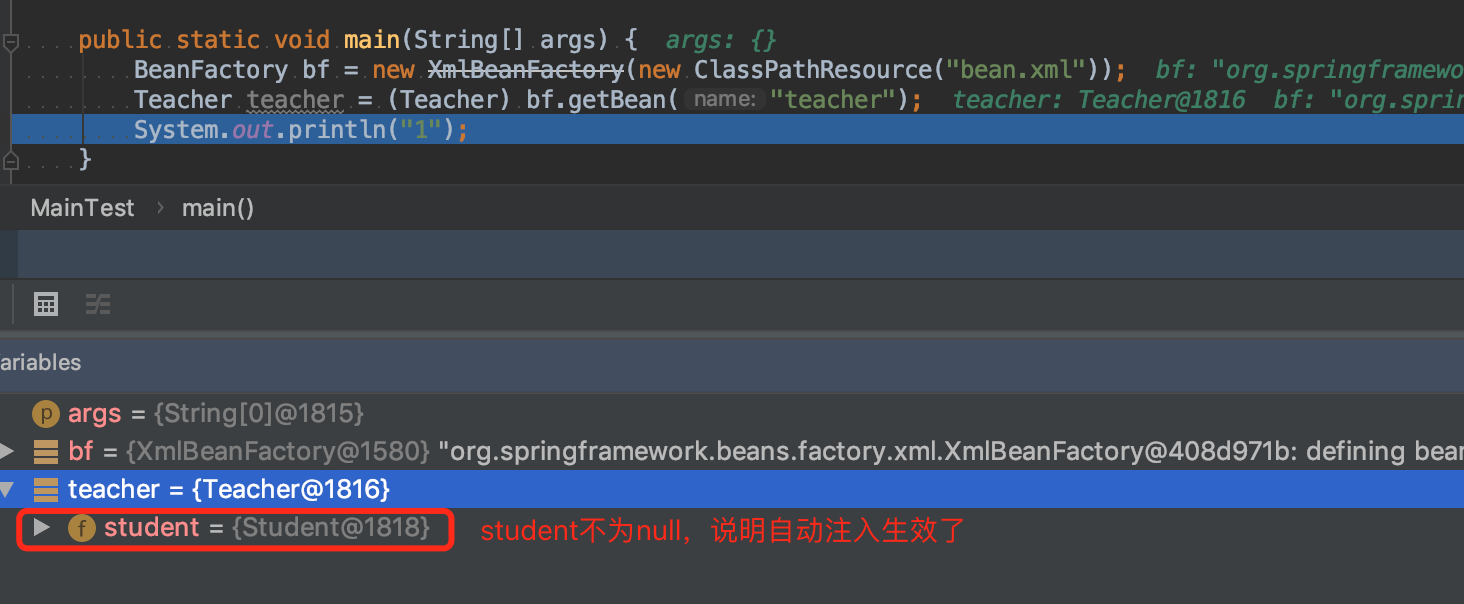
刚才在“setter注入”这节中介绍了populateBean方法,也说了会“提取基于XML的自动依赖注入所需要注入的属性”,然后反射调用setter方法将值设置到bean中。再来回顾一下这段代码:1
2
3
4
5
6
7
8
9
10
11
12
13
14
15
16
17
18
19
20
21
22
23protected void populateBean(String beanName, RootBeanDefinition mbd, @Nullable BeanWrapper bw) {
......
//提取“基于XML的自动依赖注入”所需要注入的属性
if (mbd.getResolvedAutowireMode() == RootBeanDefinition.AUTOWIRE_BY_NAME ||
mbd.getResolvedAutowireMode() == RootBeanDefinition.AUTOWIRE_BY_TYPE) {
MutablePropertyValues newPvs = new MutablePropertyValues(pvs);
if (mbd.getResolvedAutowireMode() == RootBeanDefinition.AUTOWIRE_BY_NAME) {
autowireByName(beanName, mbd, bw, newPvs);
}
if (mbd.getResolvedAutowireMode() == RootBeanDefinition.AUTOWIRE_BY_TYPE) {
autowireByType(beanName, mbd, bw, newPvs);
}
pvs = newPvs;
}
......
//真正的属性填充步骤
if (pvs != null) {
applyPropertyValues(beanName, mbd, bw, pvs);
}
}
代码逻辑非常清晰,当配置了autowire="byType"会调用autowireByType方法,当配置了autowire="byName"会调用autowireByName方法。继续跟踪autowireByName方法吧。
看代码可以得知基于XML的自动依赖注入,会提取需要注入的属性名,然后只是简单的通过getBean(propertyName)来获取需要注入的属性值。
在提取需要注入的属性名时,有多个限制条件:“有setter && 需要依赖检查 && 未配置1
2
3
4
5
6
7
8
9
10
11
12
13
14
15
16
17
18
19
20
21
22
23
24
25
26
27
28protected void autowireByName(String beanName, AbstractBeanDefinition mbd, BeanWrapper bw, MutablePropertyValues pvs) {
//提取需要注入的属性名
String[] propertyNames = unsatisfiedNonSimpleProperties(mbd, bw);
for (String propertyName : propertyNames) {
if (containsBean(propertyName)) {
//通过名字获取bean
Object bean = getBean(propertyName);
pvs.add(propertyName, bean);
......
}
......
}
}
protected String[] unsatisfiedNonSimpleProperties(AbstractBeanDefinition mbd, BeanWrapper bw) {
Set<String> result = new TreeSet<>();
//已配置<property>标签的属性
PropertyValues pvs = mbd.getPropertyValues();
//所有有setter/getter的属性
PropertyDescriptor[] pds = bw.getPropertyDescriptors();
for (PropertyDescriptor pd : pds) {
//有setter && 需要依赖检查 && 未配置<property>注入 && 不是简单属性
if (pd.getWriteMethod() != null && !isExcludedFromDependencyCheck(pd) && !pvs.contains(pd.getName()) &&
!BeanUtils.isSimpleProperty(pd.getPropertyType())) {
result.add(pd.getName());
}
}
return StringUtils.toStringArray(result);
}
综上,基于XML的自动依赖注入支持对“有setter && 需要依赖检查 && 未配置
五、基于注解的的依赖注入
基于注解的依赖注入牵扯到后文ApplicationContext和BeanPostProcessor的知识了,看之前可以先看下这两节。
基于注解的依赖注入是最常用的方式了,通过@Resource/@Autowired两个注解就可以实现依赖注入,十分方便,先看看怎么配置:1
2
3
4
5
6
7
8
9
10
11
12<?xml version="1.0" encoding="UTF-8"?>
<beans xmlns="http://www.springframework.org/schema/beans"
xmlns:xsi="http://www.w3.org/2001/XMLSchema-instance"
xmlns:context="http://www.springframework.org/schema/context"
xsi:schemaLocation="http://www.springframework.org/schema/beans http://www.springframework.org/schema/beans/spring-beans.xsd http://www.springframework.org/schema/context http://www.springframework.org/schema/context/spring-context.xsd">
<bean id="student" class="com.example.methodlog.Student"/>
<bean id="teacher" class="com.example.methodlog.Teacher"/>
<!-- 启用自动注入 -->
<context:annotation-config/>
</beans>
1 | public class Teacher { |
1 | public static void main(String[] args) { |
这里用到了ClassPathXmlApplicationContext作为工厂,同时使用了context:annotation-config/配置,还在字段上使用了@Resource/@Autowired两个注解,但我们运行代码之后,发现也是能够顺利注入的。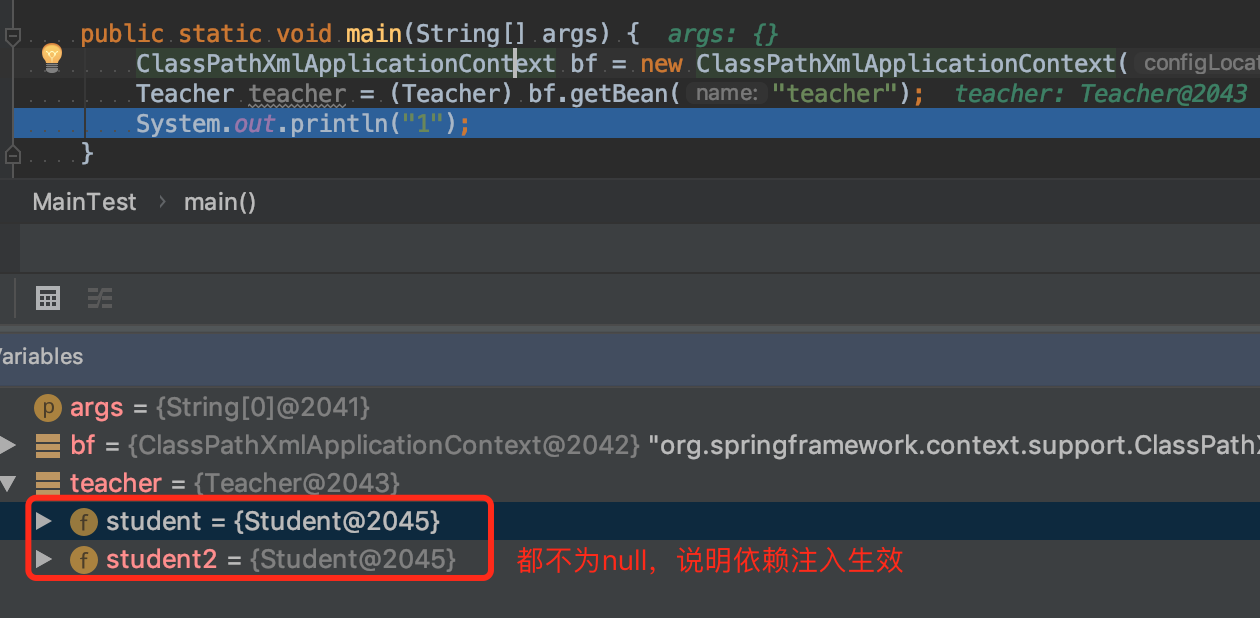
context:annotation-config/表示向Spring容器注册AutowiredAnnotationBeanPostProcessor,CommonAnnotationBeanPostProcessor,PersistenceAnnotationBeanPostProcessor,RequiredAnnotationBeanPostProcessor这4个bean,注册这4个bean处理器主要的作用是为了Spring能够识别相应的注解,即把context:annotation-config/替换成以下代码也是同样的效果。
AutowiredAnnotationBeanPostProcessor:如果想使用@Autowired注解,需要在Spring容器中声明该Bean。
CommonAnnotationBeanPostProcessor:如果想使用@Resource、@ PostConstruct、@ PreDestroy等注解就必须声明该Bean。
PersistenceAnnotationBeanPostProcessor:如果想使用@PersistenceContext注解,需要在Spring容器中声明该Bean。
RequiredAnnotationBeanPostProcessor:如果想使用@Required注解,需要在Spring容器中声明该Bean。1
2
3
4
5<!--<context:annotation-config/>-->
<bean class="org.springframework.beans.factory.annotation.AutowiredAnnotationBeanPostProcessor "/>
<bean class="org.springframework.context.annotation.CommonAnnotationBeanPostProcessor"/>
<bean class="org.springframework.orm.jpa.support.PersistenceAnnotationBeanPostProcessor"/>
<bean class="org.springframework.beans.factory.annotation.RequiredAnnotationBeanPostProcessor"/>
咋们在这里暂且不讨论这几个bean的具体实现代码,只是先说明AutowiredAnnotationBeanPostProcessor和CommonAnnotationBeanPostProcessor怎么支持注解的。
context:annotation-config/表示向Spring容器注册了几个后处理器
再次回到Bean加载过程中的doCreateBean方法,在实例化完bean还未填充属性前,会应用MergedBeanDefinitionPostProcessor后处理器,这里会对@Autowired/@Resource进行预解析,解析哪些属性需要进行属性填充。
在属性填充方法populateBean中,会再次应用InstantiationAwareBeanPostProcessor后处理器,真正进行属性填充。
AbstractAutowireCapableBeanFactory.java 1
2
3
4
5
6
7
8
9
10
11
12
13
14
15
16
17
18
19
20
21
22
23
24
25
26
27
28
29
30
31
32
33
34protected Object doCreateBean(final String beanName, final RootBeanDefinition mbd, final @Nullable Object[] args){
......
//实例化bean
instanceWrapper = createBeanInstance(beanName, mbd, args);
......
//应用MergedBeanDefinitionPostProcessor后处理器(@Autowired/@Resource的预解析)
applyMergedBeanDefinitionPostProcessors(mbd, beanType, beanName);
......
//bean的属性填充
populateBean(beanName, mbd, instanceWrapper);
......
}
protected void applyMergedBeanDefinitionPostProcessors(RootBeanDefinition mbd, Class<?> beanType, String beanName) {
for (BeanPostProcessor bp : getBeanPostProcessors()) {
if (bp instanceof MergedBeanDefinitionPostProcessor) {
MergedBeanDefinitionPostProcessor bdp = (MergedBeanDefinitionPostProcessor) bp;
bdp.postProcessMergedBeanDefinition(mbd, beanType, beanName);
}
}
}
protected void populateBean(String beanName, RootBeanDefinition mbd, @Nullable BeanWrapper bw) {
......
for (BeanPostProcessor bp : getBeanPostProcessors()) {
if (bp instanceof InstantiationAwareBeanPostProcessor) {
InstantiationAwareBeanPostProcessor ibp = (InstantiationAwareBeanPostProcessor) bp;
//属性填充前的再处理(@Autowired/@Resource的属性值填充)
pvs = ibp.postProcessPropertyValues(pvs, filteredPds, bw.getWrappedInstance(), beanName);
if (pvs == null) {
return;
}
}
}
......
}
通过刚才的代码,可以看到
如果要研究@Resource注解需要看CommonAnnotationBeanPostProcessor#postProcessMergedBeanDefinition和CommonAnnotationBeanPostProcessor#postProcessPropertyValues两个方法
如果要研究@Autowired注解需要看AutowiredAnnotationBeanPostProcessor#postProcessMergedBeanDefinition和AutowiredAnnotationBeanPostProcessor#postProcessPropertyValues两个方法
那我们从比较复杂一点的@Autowired注解入手吧,先看AutowiredAnnotationBeanPostProcessor#postProcessMergedBeanDefinition方法:
从 fields 找@Autowired注解,若找到,则创建AutowiredFieldElement实例,并放入 currElements 队列中
从 methods 中找@Autowired注解,若找到,则创建AutowiredMethodElement实例,并放入 currElements 队列中
最后,通过 bean 的 Class 对象 和 curreElements 构建InjectionMetadata实例并返回
AutowiredAnnotationBeanPostProcessor.java 1
2
3
4
5
6
7
8
9
10
11
12
13
14
15
16
17
18
19
20
21
22
23
24
25
26
27
28
29
30
31
32
33
34
35
36
37
38
39
40
41
42
43
44
45
46
47
48
49
50
51
52
53
54
55
56
57
58
59
60
61
62
63
64
65
66
67
68
69
70
71
72
73
74
75
76
77
78
79
80@Override
public void postProcessMergedBeanDefinition(RootBeanDefinition beanDefinition, Class<?> beanType, String beanName) {
InjectionMetadata metadata = findAutowiringMetadata(beanName, beanType, null);
metadata.checkConfigMembers(beanDefinition);
}
private InjectionMetadata findAutowiringMetadata(String beanName, Class<?> clazz, @Nullable PropertyValues pvs) {
String cacheKey = (StringUtils.hasLength(beanName) ? beanName : clazz.getName());
// 先从缓存中找 InjectionMetadata,诸如 @Autowire,@Inject等
InjectionMetadata metadata = this.injectionMetadataCache.get(cacheKey);
if (InjectionMetadata.needsRefresh(metadata, clazz)) {
synchronized (this.injectionMetadataCache) {
metadata = this.injectionMetadataCache.get(cacheKey);
if (InjectionMetadata.needsRefresh(metadata, clazz)) {
if (metadata != null) {
metadata.clear(pvs);
}
// 缓存中没有,那么去扫描类,提取需要注入的属性
metadata = buildAutowiringMetadata(clazz);
this.injectionMetadataCache.put(cacheKey, metadata);
}
}
}
return metadata;
}
private InjectionMetadata buildAutowiringMetadata(final Class<?> clazz) {
List<InjectionMetadata.InjectedElement> elements = new ArrayList<>();
Class<?> targetClass = clazz;
do {
final List<InjectionMetadata.InjectedElement> currElements = new ArrayList<>();
// 寻找有Autowired注解的属性
ReflectionUtils.doWithLocalFields(targetClass, field -> {
AnnotationAttributes ann = findAutowiredAnnotation(field);
if (ann != null) {
// 如果当前处理的属性是静态属性,则直接返回
if (Modifier.isStatic(field.getModifiers())) {
if (logger.isWarnEnabled()) {
logger.warn("Autowired annotation is not supported on static fields: " + field);
}
return;
}
boolean required = determineRequiredStatus(ann);
currElements.add(new AutowiredFieldElement(field, required));
}
});
// 寻找有Autowired注解的方法
ReflectionUtils.doWithLocalMethods(targetClass, method -> {
Method bridgedMethod = BridgeMethodResolver.findBridgedMethod(method);
if (!BridgeMethodResolver.isVisibilityBridgeMethodPair(method, bridgedMethod)) {
return;
}
AnnotationAttributes ann = findAutowiredAnnotation(bridgedMethod);
if (ann != null && method.equals(ClassUtils.getMostSpecificMethod(method, clazz))) {
if (Modifier.isStatic(method.getModifiers())) {
if (logger.isWarnEnabled()) {
logger.warn("Autowired annotation is not supported on static methods: " + method);
}
return;
}
if (method.getParameterCount() == 0) {
if (logger.isWarnEnabled()) {
logger.warn("Autowired annotation should only be used on methods with parameters: " +
method);
}
}
boolean required = determineRequiredStatus(ann);
PropertyDescriptor pd = BeanUtils.findPropertyForMethod(bridgedMethod, clazz);
currElements.add(new AutowiredMethodElement(method, required, pd));
}
});
elements.addAll(0, currElements);
targetClass = targetClass.getSuperclass();
}
while (targetClass != null && targetClass != Object.class);
// 构建返回值并返回
return new InjectionMetadata(clazz, elements);
}
刚才说已经说了AutowiredAnnotationBeanPostProcessor#postProcessMergedBeanDefinition会预解析需要注入的属性,那么继续看AutowiredAnnotationBeanPostProcessor#postProcessPropertyValues方法如何将属性值注入到属性中的。
首先寻找需要注入的属性,但之前已经预解析过了,所以这里直接从缓存中获取需要注入的属性
调用metadata.inject方法注入属性,继续深入分析该步骤
AutowiredAnnotationBeanPostProcessor.java 1
2
3
4
5
6
7
8
9
10
11
12
13
14
15
16public PropertyValues postProcessPropertyValues(
PropertyValues pvs, PropertyDescriptor[] pds, Object bean, String beanName) throws BeanCreationException {
// 之前已经预解析过了,所以这里直接从缓存中获取需要注入的属性
InjectionMetadata metadata = findAutowiringMetadata(beanName, bean.getClass(), pvs);
try {
// 真正的关键方法
metadata.inject(bean, beanName, pvs);
}
catch (BeanCreationException ex) {
throw ex;
}
catch (Throwable ex) {
throw new BeanCreationException(beanName, "Injection of autowired dependencies failed", ex);
}
return pvs;
}
从之前一小节分析可以得知,InjectionMetadata对象本身是一个包含了一系列 AutowiredFieldElement 和 AutowiredMethodElement 对象的队列所构成。这里呢,通过迭代 InjectedElement 依次处理 AutowiredFieldElement 或 AutowiredMethodElement 元素;关键代码在element.inject这一行。1
2
3
4
5
6
7
8
9
10
11
12
13
14public void inject(Object target, @Nullable String beanName, @Nullable PropertyValues pvs) throwsThrowable {
Collection<InjectedElement> checkedElements = this.checkedElements;
Collection<InjectedElement> elementsToIterate =
(checkedElements != null ? checkedElements : this.injectedElements);
if (!elementsToIterate.isEmpty()) {
boolean debug = logger.isDebugEnabled();
for (InjectedElement element : elementsToIterate) {
if (debug) {
logger.debug("Processing injected element of bean '" + beanName + "': " + element);
}
element.inject(target, beanName, pvs);
}
}
}
注意,InjectedElement 是 AutowiredFieldElement 和 AutowiredMethodElement 的超类,所以,接下来的流程会分为两种情况,这里以对类变量的设值为例。这个方法做了两件事:解析 @Autowired 所标注的 ref bean,然后将该 ref bean 通过 field 反射注入当前的 bean1
2
3
4
5
6
7
8
9
10
11
12
13
14
15
16
17
18
19
20@Override
protected void inject(Object bean, @Nullable String beanName, @Nullable PropertyValues pvs) throws Throwable {
Field field = (Field) this.member;
Object value;
......
try {
//从容器中找对应的bean
value = beanFactory.resolveDependency(desc, beanName, autowiredBeanNames, typeConverter);
}
catch (BeansException ex) {
//这里可能抛出NoUniqueBeanDefinitionException、NoSuchBeanDefinitionException
throw new UnsatisfiedDependencyException(null, beanName, new InjectionPoint(field), ex);
}
......
if (value != null) {
//反射设值
ReflectionUtils.makeAccessible(field);
field.set(bean, value);
}
}
继续跟踪beanFactory.resolveDependency这行代码,可以看到@Autowired注解主要做了以下几件事:
1、首先根据类型找到所有可以满足条件的bean
2、如果返回的bean有多个,则根据@Primary 和 @Priority 注解进行筛选寻找最优
3、如果筛选不成功,相当于找到了两个bean,根据@Required注解来判断是否抛出NoUniqueBeanDefinitionException
4、如果只有一个,则直接使用此bean1
2
3
4
5
6
7
8
9
10
11
12
13
14
15
16
17
18
19
20
21
22
23
24
25
26
27
28
29
30
31
32
33
34
35
36
37
38
39
40
41
42
43
44
45
46
47
48
49
50
51@Override
@Nullable
public Object resolveDependency(DependencyDescriptor descriptor, @Nullable String requestingBeanName,
@Nullable Set<String> autowiredBeanNames, @Nullable TypeConverter typeConverter) throws BeansException {
......
// 大部分的通过 @Autowired 注解的普通 bean 将会在这里进行初始化
result = doResolveDependency(descriptor, requestingBeanName, autowiredBeanNames, typeConverter);
......
}
@Nullable
public Object doResolveDependency(DependencyDescriptor descriptor, @Nullable String beanName,
@Nullable Set<String> autowiredBeanNames, @Nullable TypeConverter typeConverter) throws BeansException {
......
// 根据type去寻找满足的bean
Map<String, Object> matchingBeans = findAutowireCandidates(beanName, type, descriptor);
if (matchingBeans.isEmpty()) {
if (isRequired(descriptor)) {
raiseNoMatchingBeanFound(type, descriptor.getResolvableType(), descriptor);
}
return null;
}
String autowiredBeanName;
Object instanceCandidate;
if (matchingBeans.size() > 1) {
// 根据 @Primary and @Priority 注解进行筛选
autowiredBeanName = determineAutowireCandidate(matchingBeans, descriptor);
if (autowiredBeanName == null) {
if (isRequired(descriptor) || !indicatesMultipleBeans(type)) {
// 找到了两个bean,抛出NoUniqueBeanDefinitionException
return descriptor.resolveNotUnique(type, matchingBeans);
}
else {
return null;
}
}
instanceCandidate = matchingBeans.get(autowiredBeanName);
}
else {
// 刚好只有一个合适的bean
Map.Entry<String, Object> entry = matchingBeans.entrySet().iterator().next();
autowiredBeanName = entry.getKey();
instanceCandidate = entry.getValue();
}
......
Object result = instanceCandidate;
......
return result;
}
最后看@Resource注解,我们来看@Resource如何寻找一个bean。默认在不写Resource(name)的情况下:
判断beanFactory是否存在此name的bean
如果存在,则直接使用此name获取bean
如果不存在,则使用按类型注入,resolveDependency()方法很熟悉,因为刚刚按类型注入才讲过。
从代码可见,通过@Resource注解获取bean时,并不是先按“byName”再按“byType”的形式。@Resource使用“byName”和“byType”是一种选择关系,根据Bean name进行选择,不存在优先顺序。1
2
3
4
5
6
7
8
9
10
11
12
13
14
15
16
17
18
19
20
21
22
23
24
25
26
27
28
29
30protected Object autowireResource(BeanFactory factory, LookupElement element, @Nullable String requestingBeanName)
throws NoSuchBeanDefinitionException {
Object resource;
Set<String> autowiredBeanNames;
String name = element.name;
if (this.fallbackToDefaultTypeMatch && element.isDefaultName &&
factory instanceof AutowireCapableBeanFactory && !factory.containsBean(name)) {
autowiredBeanNames = new LinkedHashSet<>();
// 没有该name对应的bean,使用按类型注入
resource = ((AutowireCapableBeanFactory) factory).resolveDependency(
element.getDependencyDescriptor(), requestingBeanName, autowiredBeanNames, null);
if (resource == null) {
throw new NoSuchBeanDefinitionException(element.getLookupType(), "No resolvable resource object");
}
}
else {
// 根据名字注入
resource = factory.getBean(name, element.lookupType);
autowiredBeanNames = Collections.singleton(name);
}
if (factory instanceof ConfigurableBeanFactory) {
ConfigurableBeanFactory beanFactory = (ConfigurableBeanFactory) factory;
for (String autowiredBeanName : autowiredBeanNames) {
if (requestingBeanName != null && beanFactory.containsBean(autowiredBeanName)) {
beanFactory.registerDependentBean(autowiredBeanName, requestingBeanName);
}
}
}
return resource;
}
六、再说结论
BeanFactory提供了基于XML形式的自动依赖注入,通过在
ApplicationContext在Spring2.5后提供了基于注解的自动依赖注入,可以注入setter、field。不管是@Autowire还是@Resource,都是基于BeanPostProcessor后处理器完成的。@Autowire提供了按类型进行注入,而@Resource比较特殊,它会在容器中有该name对应的bean时使用byName形式,否则使用byType形式,byName和byType之间并不是先后关系,而是选择关系。
autowire=”byType”、@Autowire、@Resource都可以实现依赖注入,但他们实现的代码不同,效果也不同,不能简单地混为一谈。